So if we are doing a renovation project, ideally we’d come back to office with all the dimensions to start drawing the layout.
Start with a New Project File.
Modelling the Existing Layout
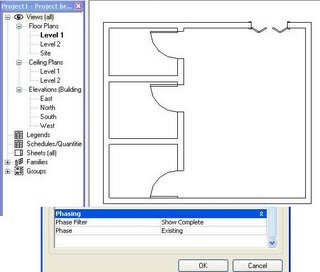
Go to Floor Plan - Level 1
Go to the View Properties and right at the bottom change Phase to “Existing” and Phase Filter to “Show Complete”. Click "OK".
(Here we informed Revit that whatever we draw on this view, is part of the Existing Layout)
Now start drawing your layout as you would for any other Plan. What you draw here is the Existing Layout.

Demolition Plan
Next we may want to demolish certain walls or components
So before you do anything further Duplicate your Floor Plan – Level 1
Rename it to call it “Level 1 – Demolished”
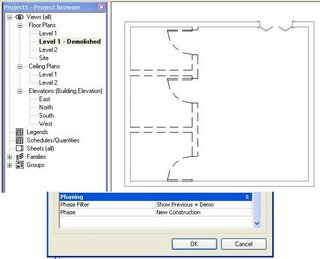
Now go to the View Properties, and Change the Phase to “New Construction” and Phase Filter to “Show Previous + Demo”
(Here we informed Revit that whatever we do in this view is part of the New Construction-Demolition is part of new construction, ain’t it? We also asked Revit to Show us the Existing Layout + the Demolished Portion)
Once you Click “OK” for View Properties, you’ll see that your “Floor Plan – Level 1 -Demolished” will show your existing Layout as greyed out. These are the graphic overrides assigned / predefined and are specific only to this view.
Now to start demolishing, use the Hammer Tool (Demolition Tool) from the Toolbars and start hammering any wall or Window/Door/Component that you want to demolish. (For initial understanding please use simple examples)

You’ll notice that the Objects you hammered turned out in dashed lines(black in colour). Again this is a Graphic Override predefined for objects that are demolished. These Graphic Overrides were applied to this view only coz of the View Properties that we had set previously.
Adding to the New Construction
Once the Demolition is done, we may want to construct something new on our layout.
So go ahead and Duplicate your “Floor Plan – Level 1 – Demolished” and Rename it to call it “Floor Plan – Level 1 – New”
In this view, like every other view, we first go and change the View Properties to suit the purpose of this view.
So go to View Properties for this New View.
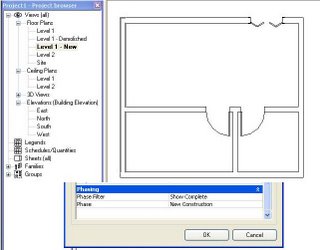
Leave the Phase as “New Construction”
Set the Phase Filter as “Show Complete”
With this we informed Revit that the objects that we are going to make are still part of New Construction but we want to see the Building as Complete. That means, we shall see the Existing Objects which are not demolished and all the objects that we shall create new.
So go ahead and add new walls, doors & windows for the New Construction.

Now we have Three Separate Views
Level 1 – New
Level 1 – Demolished
Level 1 (Lets rename this to call it “Level 1 – Existing”. Make sure you Click “No” when it asks you to Rename the Corresponding Views. Coz you obviously don’t want the Datum Levels in the Elevations & Sections to tell you its “Level 1 – Existing” !!)
Now go ahead and Change the Phase Filters for the 3D Views and get the same effect there!!

::Comments Awaited::
